Hi there!
Thank you for installing Free Batch Watermark Studio and trying it out. Here you will find more information and help for Free Batch Watermark Studio. As you might have noticed, Free Batch Watermark Studio is an extremely easy to use program. It allows you to create watermarks and put them on your photos and pictures. Watermarks are an efficient way to prevent the unauthorized distribution of your images. With Free Batch Watermark Studio you can create and combine graphical logos, images and text to compose your own unique watermark. You can freely arrange different parts, change their size and use rotation and transparency effects. Whether you want to create a watermark on a single image or use it on hundreds of images at once, Free Batch Watermark Studio has got you covered. Export the watermarked photos with a single click. With Free Batch Watermark Studio you can even resize and convert your photos to different image file formats. Before we start you might want to check out the Free Batch Watermark Studio 30 seconds tutorial. Maybe that will already be enough to get you started. Otherwise, let’s get rolling… Free Batch Watermark Studio helps you to create visual and transparent watermarks on your photos and pictures to protect them from unauthorized use before you upload them on the web or share them with the world.How does it work?
It is extremely simple. After downloading and installing Free Batch Watermark Studio you will find an icon of Free Batch Watermark Studio on your desktop. It looks like this:
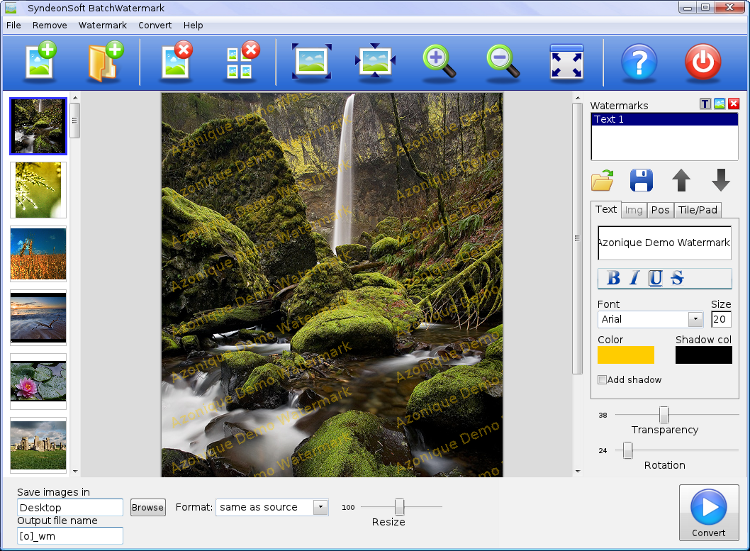
- Add file(s): This will open the file choosing dialog where you can pick one or many files to add to Free Batch Watermark Studio. They will be added in the left thumbnail view column. By clicking on any thumbnail you will be able to see the image in the center in its full size.
- Add folder(s): This will open the folder choosing dialog where you can pick a folder to add to Free Batch Watermark Studio. All the photos and pictures in that folder will be added automatically to the thumbnail view column on the left.
- Remove files: You can remove one or several added photo files and pictures from the thumbnail view by selecting them with the mouse. You can use the SHIFT and CTRL keys to tailor your selection. Removing the files from the list will not delete the files from your disk drive. It will simply remove them from the list of images to be processed.
- Clear all files: This will completely clear the thumbnail list. Clearing the list of images will not delete the files from your disk drive. You will simply have removed all the images from the list of images to be processed.
- Original size: This will display the currently displayed photo in its original size.
- Fit to screen: This will display the currently displayed photo such that the whole photo will be visible on the screen.
- Zoom in: Magnifies the view of the currently displayed photo.
- Zoom out: Zooms out of the currently displayed photo.
- Full screen: Shows the currently displayed photo with all the applied watermarks in full screen mode.
- Help: goes to the help page for more information how to use Free Batch Watermark Studio.
- Quit: closes Free Batch Watermark Studio.
Watermarking photos
With Free Batch Watermark Studio you can create custom made watermarks to protect your photos. You can arrange the individual parts of the watermark freely and change their attributes as you see fit.
Here is list of steps how to create watermarks and put them on your photos. Below, you will find more detailed information on the possibitlities that the watermark elements offer.- Select one or more image files for watermarking: Click on the toolbar icons to add files (Add file(s)) or folders (Add folder). This will load thumbnail images of your selected photos into the thumnails list on the left. When you click on any of the thumbnails the photo will be shown in the center of the window in the original size. You can adjust the size by using the toolbar buttons to fit the size, show original size, zoom in and zoom out.
- Add an image or text layer: On the right panel of Free Batch Watermark Studio you will find the options to create new watermarks. The top field contains a list of all the watermark layers. Intially this field is empty. By clicking on the icons for either text layers or image layers you create a new layer. If you choose a text layer fill out the Text tab with your branding text and the font attributes. If you choose an image layer: select an image with the file chooser and resize the image to your liking. Then, go on to adjust the position, tiling, transparency and rotation to your liking. Add more layers if needed. You will find more information about the properties of text layers and image layers below.
- Select output folder: Click on the browse button to choose your output folder for the processed images. You can also change how the processed files will be named in the “Output file name” field. The combination “[o]” is a placeholder for the original image name without the file extention. Thus if you want to rename your photos like this: myfile.jpg => myfile_watermark.jpg you would enter “[o]_watermark” in the filename field.
- Adjust output format: Free Batch Watermark Studio allows you to convert the image file format when adding watermarks to your photos. You could for example have a collection of JPG and GIF images which you would like to transform to PNG images with watermarks on them. The dropdown menu Format offers you the available output formats. The “same as source” option is used when you want to keep the file format the same as the original image.
- Resize photos: At the same as attaching a watermark to the photos Free Batch Watermark Studio also can resize your images. Simply use the Resize slider to determine the desired output file size. The slider numbers are in percentages of the orginal file. Thus, if you would like to double the image size you would use 200%. If you want to half the size set it to 50%.
- Press the Convert button: this will start the processing. All files will be loaded one after another and the watermark applied. The resulting new watermarked files will be saved in the output folder with an new name.
Text layer options
You can create text layers with the T icon next to the watermark list on the right. Clicking on this icon will create a new text layer with the name “Text NUM” where NUM is the number of text layers already used.
In the text tab you can fillout the containing text and the text attributes:- (B)old: This will make the text printed in bold face.
- (I)talic: This will make the text printed in italic face.
- (U)nderline: This will underline your text watermark.
- (S)trike: This will strike through your text watermark.
- Font: Choose from the dropdown menu the font you want to use.
- Size: Set the font size. Use Enter to effect the changes.
- Color: This will popup up a color picker where you can change the color or the text watermark.
- Shadow Color: This will popup a color picker where you can change the color of the shadow color. This will only have an effect if you have ticked the “Add shadow” check button right below.
- Add shadow: Tick this option if you want to have a drop shadow added to the text watermark. The shadow will be in the shadow color specified above.
Image layer options
You can create image layers with the image icon next to the watermark list on the right. Clicking on this icon will create a new image layer with the name “Image NUM” where NUM is the number of image layers already used.
In the Img tab you can click the browse button to choose an image file or logo that you want to use as an image watermark. You can use the slider to shrink or enlarge the loaded image to suit your needs.General layer options
There are several layer options which are used for text as well as for image layers: the “Pos” and “Tile/Pad” tabs as well as the sliders for transparency and rotation.
The Position (Pos) tab:- Preset: Free Batch Watermark Studio allows positioning any layer with 9 presets relative to the photo. Click on any of the 9 locations to transfer the layer to the position. The presets are formed by the matrix of (Left, Middle, Right) and (Top, Middle, Bottom).
- Custom: If you need more control you can use this option to position the layer exactly where you want it to be. The input fields top and left, correspond to the upper left corner of the layer. Indicate the desired position in pixels.
- Tiling: You make the layer repeat / tile horizontally and vertically over the whole image by ticking the “Tile horizontal” or “Tile vertical” checkboxes respectively.
- Padding: You can pad the layers left, top, right, bottom. Indicate the padding in pixels in the correponding input fields.
Saving Watermark templates
Once you have created your custom watermark with one or several text and image layers you can save the template in a file for later re-use. Click on the save icon below the watermark list field.
Loading Watermark templates
In order to reuse an existing watermark simple use the load icon below the watermark list field and select the watermark template you wish to use in the file choosing dialog. This will load all the layers and settings so that you can just create a new batch of watermarked images with your custom logo and watermark within seconds.
Resizing Photos
Free Batch Watermark Studio has been primarily designed to apply watermarks to photos and images. However, it can also be easily used to resize any number of photos. To do that, all you have to do is not to use any watermarks. Simply load any number of images into Free Batch Watermark Studio and export them with the resize slider on the desired position. Here is a detailed step by step instruction:
- Select one or more images for resizing: Click on the toolbar icons to add files (Add file(s)) or folders (Add folder). This will load thumbnail images of your selected photos into the thumnails list on the left.
- Select output folder: Click on the browse button to choose your output folder for the processed images. You can also change how the processed files will be named in the “Output file name” field. The “[o]” character sequence is a place holder for the original filename. Hence, if you want to resize a picture photo.png to resized_photo.png you would add “resized_[o]” to the field.
- Adjust the resize slider: The numbers are in percent of the original file size. In order to half the picture size you would select a value of 50. If you wanted to double the picture size set the slider to 200.
- Press the Convert button: this will start the processing. All files will be loaded one after another and resized appropriately. The resulting new resized files will be saved in the output folder with an new name.
Converting photos to different file formats
Free Batch Watermark Studio has been primarily designed to apply watermarks to photos and images. But it can also be easily used to convert any number of photos into different image file formats.
This can be done simply by not applying any watermarks in the processing pipeline. Simply load any number of images into Free Batch Watermark Studio and export them with the new file format specified. Here is a detailed step by step instruction:- Select one or more images for image file format conversion: Click on the toolbar icons to add files (Add file(s)) or folders (Add folder). This will load thumbnail images of your selected photos into the thumnails list on the left.
- Select output folder: Click on the browse button to choose your output folder for the processed images. You can also change how the processed files will be named in the “Output file name” field. The sequence “[o]” stands as a place holder for the original filename without file extension. (See above).
- Select file format: select the new image file format in the Format drop down menu. Free Batch Watermark Studio offers conversion into the post popular image file formats.
- Press the Convert button: this will start the processing. All files will be loaded one after another and saved in your chosen image file format. The resulting new files converted into the new image file format will be saved in the output folder with a new name.