Hi there!
Thank you for installing Steganomatic and trying it out. Here you will find more information and help for Steganomatic. As you might have noticed, Steganomatic is an extremely easy to use program. It allows you to hide any kind of files, data and secret messages in pictures. You can use Steganomatic to hide secret messages in images and send them as an attachment in e-mails, upload them to your website or to photo sharing services. Your secrets will be hidden in plain sight. Steganomatic additionally allows you to encrypt all your files and secret messages with industrial strength encryption algorithms so that your secrets are completely safe. Before we start you might want to check out the Steganomatic 30 seconds tutorial. Maybe that will already be enough to get you started. Otherwise, let’s get rolling… Steganomatic helps you to hide secret messages and any kind of files within photos and images. With its industrial strength encryption algorithms it will make sure that your data is totally safe and hidden in plain sight.How does it work?
It is extremely simple. After downloading and installing Steganomatic you will find an icon of Steganomatic on your desktop. It looks like this:
- Main menu: This will display the dashboard view as seen in the screenshot above. From here you can select the tasks you want to perform. Alternatively, you can also use the toolbar for it.
- Hide files in images: This will switch to the “Hide files in images” interface, where you can select your container images and photos and the files you want to hide as well as secret messages. Additionally you can set all the encryption options to make sure your data is totally safe.
- Unhide files from images: This will switch to the “Unhide files from images” interface, load pictures that contain hidden data, set decryption options and restore the hidden files and secret messages. With a single click of a button you will be able to export all the hidden files.
- Clear / Reset all fields: This will reset all fields in the respective interface in case you want to hide more files in different containers or extract more data from other photos with hidden messsages in them.
- Close: closes Steganomatic.
- Help: goes to the help page for more information how to use Steganomatic.
- About: This will show the ‘About’ dialog of Steganomatic and some program information.
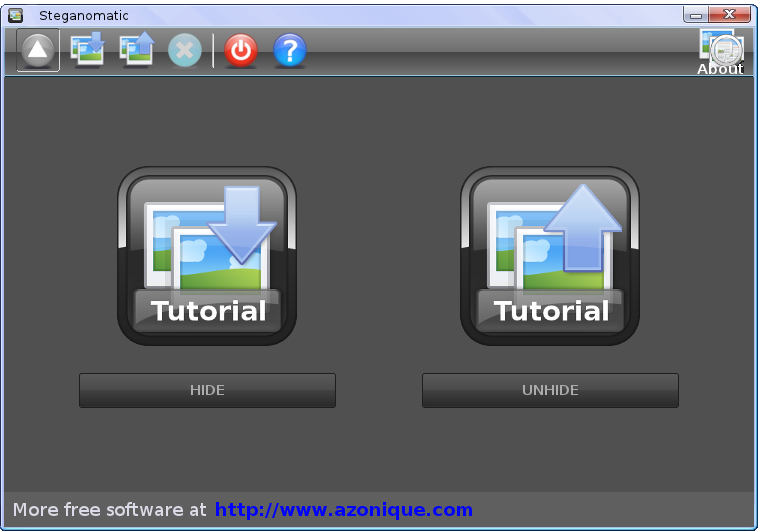
The Dashboard
Clicking on the “Main Menu” icon in the toolbar or when starting up Steganomatic you will be presented with the dashboard which features the two separate tasks which you can perform with Steganomatic. You can click on any of the buttons to perform the specific task. They are as follows:
- Hide files in images: Clicking the “Hide” button will switch to the “Hide files in images” interface, where you can set all the options to hide data and secret messages in photos.
- Unhide files from images: This will switch to the “Unhide files from images” interface, where you can set all the options to recover hidden data files and secret messages from the container images.
Hiding files in images
Clicking on the ‘Hide’ button in the dashboard brings you to the interface for hiding files in pictures:
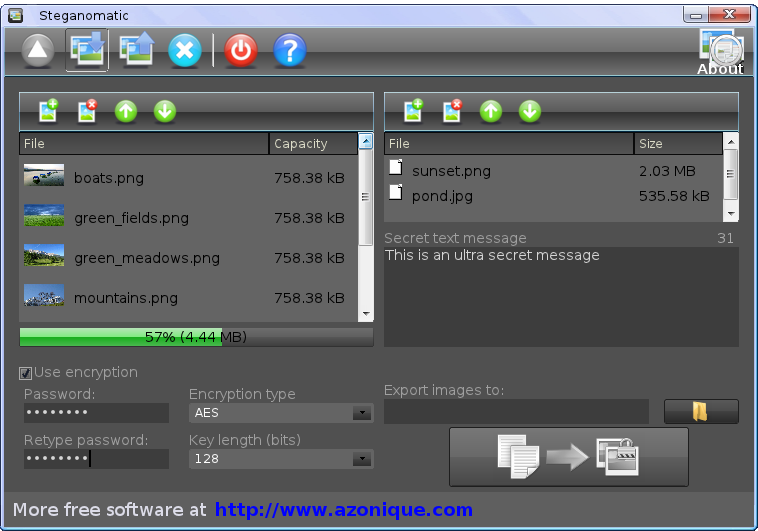
- Choose container images: Choose one or several container photos by clicking the add-file icon on the left. This will popup a file choosing dialog where you can pick a file(s). Allowed image file formats are JPG, PNG, GIF and BMP images. There are some restrictions for these file formats which you must take into account (see below).
- Choose secret data files: Chose one or more secret files to hide within the container images with the add-file icon on the right. This will popup a file choosing dialog where you can pick a file(s). Observe the fill bar indicator below the container picture list to gauge if you have enough space inside the container images.
- Add a secret message: Optional: Add a secret message or instruction in the text field below the list of secret files. It is also possible to add only a secret message without attached secret files.
- Set encryption parameters: Optional: Tick “Use encryption”. This will allow you to set a password and choose a suitable encryption algorithm and key bit length. You will have to type the password twice to make sure you will write it correctly.
Warning: If you forget the password your secret hidden files and messages will be unrecoverable. So make sure you remember the password correctly. - Choose output folder: Select the output folder location for the modified pictures with the hidden data (Export images to).
- Hide files in pictures: Click on the “Hide” button which will become automatically active once you have entered all necessary data.
- JPG images: There are no restrictions to the kind of JPG images. Since JPG is however a lossy file format the total amount of data that can be stored within JPG images without becoming suspicious is relatively small. While Steganomatic supports the JPG/JPEG file format, we do not recommend using it for storing large amount of information.
- PNG images: The PNG file format is a lossless format. Thus much information can be hidden in such images. Due to being lossless the PNG images are usually bigger than the corresponding JPG images. One restrictions applies: The accepted PNG images are not allowed to contain a transparency / alpha channel. Hence, the allowed PNG images must be RGB only images.
- BMP images: BMP images are losslessly encoded images. Most BMP images are not compressed and are therefore usually huge. It is not recommended to upload them to websites and photo sharing sites since they are unusual file formats to use for e.g. holiday photos. Nevertheless, since BMP images are lossless they offer the a much larger storage capacity than JPG images. The storage capacity is identical to the PNG images, but the BMP images are much larger. Thus, we recommend using the PNG file format for the best possible results. There are several restrictions to which kind of BMP images are allowed: Only 24 bit RGB BMP images are allowed. Any other BMP files such as Black and White, Indexed or 16 Bit RGB images are not allowed.
- GIF images: There are no restrictions on the use of GIF images. However, since GIF is an indexed color file format the total amount of data that can be stored within GIF images without becoming suspicious is relatively small. While Steganomatic supports the GIF file format we do not recommend using it for storing large amount of information since many GIF pictures would be needed as container images. Also, by their nature, GIF images are usually smaller than JPG/PNG images and have thus naturally less storage capacity.
Unhiding / Restoring Hidden Files from Images
Clicking on the ‘Unhide’ button in the dashboard brings you to the interface for unhiding and restoring hidden files from images:
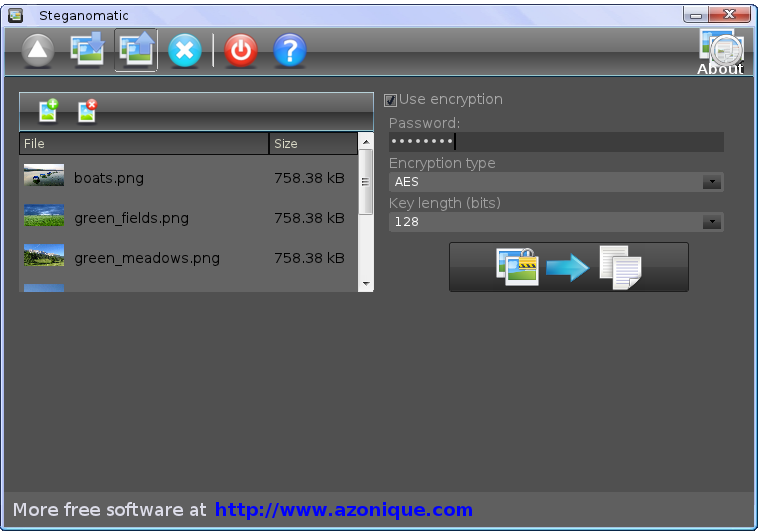
- Choose container images: Choose one or several container image files which contain hidden data. Click the add-file icon on the left. This will popup a file choosing dialog where you can pick a file(s). Notice that you must add all the container images where data has been hidden, otherwise the extraction process will fail. You must add exactly the same images as were used to hide the information. The order does not matter.
- Set decryption parameters: Optional: This is only necessary if the hidden data was encrypted. Tick “Use encryption” and provide a password, the decryption algorithm and the key length.
Notice: You must know all the parameters: passsword, algorithm and key length to successfully decrypt the hidden data. If any of these parameters are unknown you will not be able to recover the hidden data. - Unhide: Click the “Unhide” button. The button becomes active once you have entered all the necessary information.
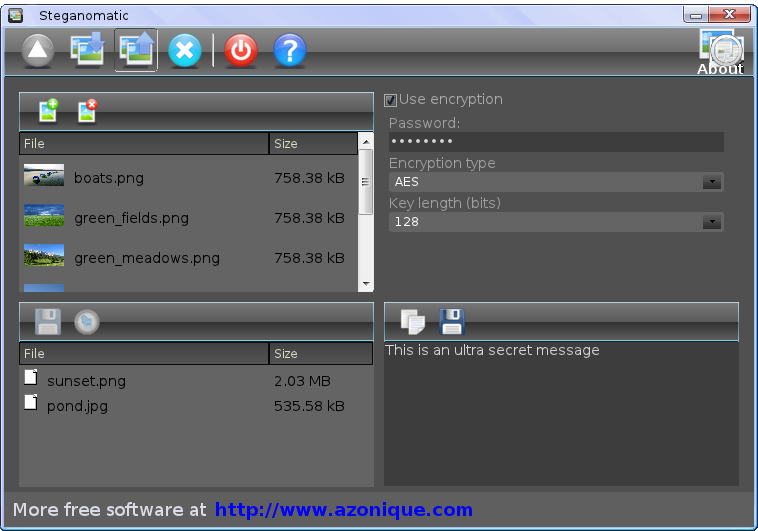
- Select files to export: Select one or more files in the list you want to export with your mouse.
- Export: Click the “Export” icon on the list toolbar and provide the folder location, where you want to extract the data.
- Select files to shred: Select one or more files in the list you want to shred with your mouse. Usually you will want to shred all of them, so select all files.
- Shred: Click the “Shred” icon on the list toolbar. All the extracted files will be shredded to pieces and become totally unrecoverable.
Notice: Shredding the extracted / recovered files does not affect the files hidden within the container images. Even after shredding the recovered files the hidden files remain hidden within the container images. In order to make sure that you don’t leave any traces, click the check button “Shred container images” after the extraction, which will also shred and wipe all the container images.
To save the secret message into a file: Click on the save icon on the right above the recovered secret message and choose a folder location, where you want to save the message. To copy the secret message to the clipboard click the clipboard icon and paste it into another application for further processing. It’s as easy as that. That’s pretty cool, isn’t it? That’s it for the help file. Steganomatic is really simple to use. We wish you happy hiding and unhiding of secret messages and files in pictures, photos and images and hope you will find it as useful and fun as we do.